Author Archives: chouse

Hot-cloning a VM without vCenter

Recently had a situation arise where a stand-alone ESXi 5 host that was not managed by vCenter (it’s standalone, get it?) needed one of its VMs cloned, but the source VM was important and could not be powered off for a cold-clone to be performed.

Thanks to VMETC.COM’s Cloning a running Virtual Machine using the Service Console, (who gives credit to Eric Siebert), the process is pretty simple, and really just uses vmkfstools to make a copy of the source VM’s disk after a snapshot has been created. This frees up the source VM’s disk(s) for reading by vmkfstools to make a copy.

  1. Create a new VM with identical settings as the source VM
    1. Memory
    2. CPU
    3. Disk (SCSI controller, etc)
    4. Network
      1. Set the NIC to not connect at startup, and change the portgroup assigned to a vSwitch with no other guest VMs or physical uplinks, in order to isolate it so it does not interfere with the source VM.
  2. Using the vSphere client connected to the host, take a snapshot of the source VM – do not include guest memory. Name the snapshot whatever you’d like.
  3. Now that a snapshot has been taken, the source VM is writing to its delta disk and not its main disk (still reads from it though) so it can be cloned using the command line.
  4. SSH to the ESXi host (or get on the ESXi host console) and navigate to the new VM’s directory and delete the vmdk files: rm *.vmdk
    1. This clears the way for the disk copy to be succcessful, but keeps the disk registration in the new VM’s vmx configuration file.
  5. Navigate to the source VM directory and use vmkfstools to clone the disk: vmkfstools -i sourceVM.vmdk -d thin /vmfs/volumes/datastore01/newVM/newVM.vmdk
    1. This will create a thin-provisioned (-d thin) copy (-i) of sourceVM.vmdk from the source VM’s directory to the newVM’s directory (/vmfs/volumes/datastore01/newVM).
  6. Clone any other disks
  7. When the clone is finished, power it on (making sure it’s on an isolated portgroup with its NIC disconnected)
    1. The OS will act like it was hard-powered-off so it may do some disk checks at boot in order to mark the filesystem as clean.
  8. Open up the console of the VM and change its IP address and hostname and anything else that would conflict with the source VM.
  9. Once done, connect it back to the appropriate portgroup and you should be all set!
  10. Don’t forget to remove the snapshot on the source VM!

The process is incredibly simple and much faster than spinning up a win2k8 instance with a demo instance of vCenter, just to make a clone of a VM. It’s also easier than using VMware Converter to do a V2V conversion.

If using this method to clone a Windows guest, there may be some extra work involved (such as re-joining to the domain, etc).
Determining linked-clone space usage

I wanted to understand how VMware View linked-clone virtual machines consume space. Thankfully, Andre Leibovici has a great article “How to read Linked Clone Storage Provisioning metrics in vCenter“, describing these three storage metrics that are visible from a VM’s Summary tab in vSphere. (Need a review of how linked-clones work? Check out Andre’s “VMware View 4.5 Linked Cloning explained“)

These three storage metrics for every VM are described as follows:

  • Provisioned Storage: amount of total storage provisioned to a VM, since thin-provisioning is in use. This only includes files in the VM directory and is the sum of the “Provisioned size” column in the VM’s folder on the datastore. These files include the main VM disk which actually points to the replica, and then also the snapshot/delta disk. So easily, a linked clone has a provisioned size that is double that of the master VM (and therefore the replica). But it’s slightly misleading because the replica will not grow, only the VM’s snapshot/delta file will grow as the VM is used, until the next recompose.
  • Not-shared Storage: the total storage actually in use by the linked-clone, which only includes files in the VM directory. This would be the sum of the “Size” column in the VM’s folder on the datastore, and is data that the linked-clone has written after recompose or refresh: changes recorded in the delta (snapshot) disk.
  • Used Storage: the sum of storage used to support the existence of the virtual machine – includes the replica disk as well as changes that the VM has written since recompose or refresh.

With these key pieces of information, we can see that the most important metric is “Not-shared Storage”. However, “Used Storage” is useful to compare space savings. If the linked-clone VM was a full-blown normal VM, it would consume the amount indicated in “Used Storage”. But since it is using linked-clone technology, it only actually uses the amount indicated in “Not-shared Storage”, because the main bulk of the VM’s data (operating system, applications baked in to the image) is actually stored in the replica disk which is also used by all the other linked-clones.

If you want to compare across the entire environment and generate a space savings calculation, a bit of powershell can accomplish this:

Function GetUsage {
	Param($datastore)
	$VMs = get-datastore $datastore | get-vm | get-view
	$VMs | foreach-object {
		$VMName = $_ | select -expandproperty name
		$VMUnshared = $_ | select -expandproperty storage | select -expandproperty perdatastoreusage | select -expandproperty Unshared
		$VMUnsharedMB = [math]::round($VMUnshared/1MB,2)
		$VMUsed = $_ | select -expandproperty storage | select -expandproperty perdatastoreusage | select -expandproperty Committed
		$VMUsedMB = [math]::round($VMUsed/1MB,2)
		$UsageObj = New-Object System.Object
		$UsageObj | add-member -type noteproperty -name Name -value $VMName
		$UsageObj | add-member -type noteproperty -name UsageMB -value $VMUnsharedMB
		$UsageObj | add-member -type noteproperty -name FullUsageMB -value $VMUsedMB
		$UsageObj
	} | sort -property Name | export-csv c:\temp\usage-$datastore.csv -notype
}

GetUsage "Linked_Clones_01"
GetUsage "Linked_Clones_02"

To run, save it to a file and change the datastores on the “GetUsage” lines (add or remove datastores as needed) and change the CSV path as necessary (default: c:\temp). Connect to a vCenter server (connect-viserver) and run the script. The resulting CSV file will have three columns: Name of the VM, UsageMB (“Not-shared storage”) and FullUsageMB (“Used Storage”).

By adding up the UsageMB column and comparing it to the sum of the FullUsageMB column, one can easily see the difference in space usage by using linked-clone technology versus full-blown virtual machines. To calculate the space savings percentage, use the formula (1-(Usage/Full)).

A customer with over 3,000 linked-clone desktops (using a master VM image of 30GB) is only using 6.55 TB on disk. If these were full-blown virtual machines, the customer would consume over 91TB. By using linked-clones, the customer is realizing a space savings of 93%. Pretty cool stuff.

Datastore usage via powershell

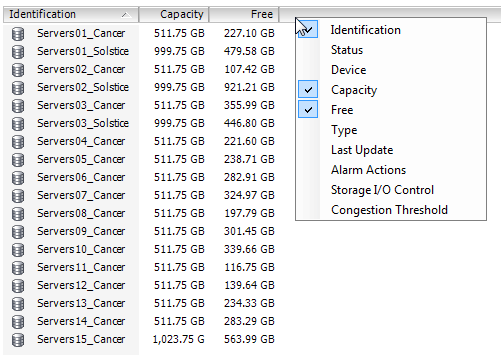
In the vSphere Client, Datastore inventory view (Ctrl+Shift+D), VMware kindly gives us datastore Capacity and Free space values, but there is no column for Provisioned.

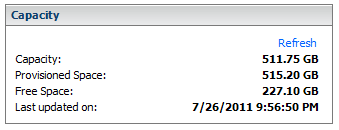
If you open a datastore, the Provisioned amount is displayed:

In my (humble) opinion, besides knowing how much Free space is left on the volume, Provisioned is important too so you know just how far in the hole you’re digging yourself by over-provisioning datastores, and it would be nice to see this in the list view of all Datastores as a way of comparison.

Since we don’t have that column available to us (VMware, pretty please?), a bit of Powershell can give us what we need.

connect-viserver your_vcenter_server
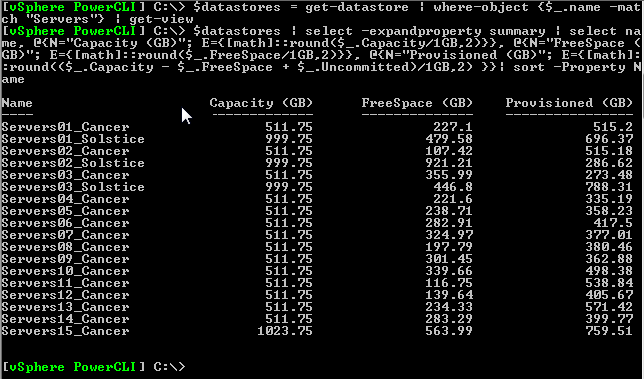
$datastores = get-datastore | where-object {$_.name -match "Servers"} | get-view
$datastores | select -expandproperty summary | select name, @{N="Capacity (GB)"; E={[math]::round($_.Capacity/1GB,2)}}, @{N="FreeSpace (GB)"; E={[math]::round($_.FreeSpace/1GB,2)}}, @{N="Provisioned (GB)"; E={[math]::round(($_.Capacity - $_.FreeSpace + $_.Uncommitted)/1GB,2) }}| sort -Property Name

In my example above, I am using where-object to filter only for datastores that have “Servers” in the name. Remove it or customize it as needed. The snippet above produces the following output:

.. you could even append “Export-CSV c:\path\to\output.csv -NoTypeInformation” to the end to write it to a CSV file, useful for Excel or other things.

Based on the following pages:

Expanding a VM’s hard drive using Powershell

Recently we needed to expand our Virtual Desktop VMs from 10GB C: drives to 15GB to accommodate some updates for one of our primary applications. The VMs are chronically low on free space so the decision was made to expand the drive.

The first step was to grow each VM’s VMDK from 10GB to 15GB. This was easily accomplished with Powershell:

Get-Folder Desktops | Get-VM | Get-HardDisk | Where {$_.CapacityKB -eq 10485760} | Set-HardDisk -CapacityKB 15728640 -Confirm:$false

Simply put, this one-liner acts against all VMs in the “Desktops” folder, and if it currently has a 10GB drive (10,485,760 KB), it uses the Set-HardDisk command to expand it to 15GB (15,728,640 KB). This worked incredibly well. I did run in to one or two VMs that had trouble expanding because they could not be “stunned” while currently in the process of VMotioning to another host. They weren’t actually migrating, so I quickly powercycled them and ran the one-liner again, with success.

The VMDKs are thin-provisioned so no additional space was consumed on the datastores, but now the disks can grow beyond 10GB, up to 15GB.

The next step which fortunately is “not my problem” is to expand the C: partition from 10GB to 15GB. I advised our desktop manager to try Dell’s “extpart” utility which can expand the C: partition while the VM is booted. I have used it successfully with Windows Server 2003, but not tried it with XP. I believe it will work though. Our desktop manager will probably make use of Altiris and some batch scripts to run extpart on all the desktops.

Changing ESXi Syslog from verbose

We have about 55 ESXi 4.1 hosts in our environment, all configured to send their syslog data to a standalone linux (Ubuntu) blade server (HP) which also runs our Nagios server monitoring system. Since pointing all the ESXi hosts to the Nagios server for their syslog data, the server is constantly drowning under a massive amount of I/O that needs to be written to the filesystem.

Using iostat -x 1 I could see that the utilization of the disks was always around 100% and the average wait could explode up to 3000+msec which is not that great. I assumed it was syslog causing the problem but I’m not quite sure. Either way, I don’t need all the verbose data from the ESXi hosts in syslog and clogging up the I/O subsystem so here is a way to change verbose logging to something else (none, error, warning, information) (based on http://communities.vmware.com/thread/285254)

Here is what I did:

  1. Enable Remote Tech Support Mode (SSH) on all hosts seen by the vCenter server “serverName” using Powershell:
    connect-viserver serverName
    get-vmhost | foreach-object { get-vmhostservice -vmhost $_ | where {$_.Key -eq 'TSM-SSH'} | start-vmhostservice -confirm:$false }
    
  2. Create a script that SSH’s to a given server to run the commands:
    #!/bin/bash
    
    ssh -l root $1 "mv /etc/vmware/hostd/config.xml /etc/vmware/hostd/config.xml.orig && sed -e 's/<level>verbose<\/level>/<level>warning<\/level>/' /etc/vmware/hostd/config.xml.orig > /etc/vmware/hostd/config.xml && mv /etc/opt/vmware/vpxa/vpxa.cfg /etc/opt/vmware/vpxa/vpxa.cfg.orig && sed -e 's/<level>verbose<\/level>/<level>warning<\/level>/' /etc/opt/vmware/vpxa/vpxa.cfg.orig > /etc/opt/vmware/vpxa/vpxa.cfg && services.sh restart hostd && /sbin/auto-backup.sh"
    

    Using sed, it updates /etc/vmware/hostd/config.xml and /etc/opt/vmware/vpxa/vxpa.cfg to replace the default “verbose” logging levels with “warning” (which could be any of the levels mentioned earlier)

  3. Run this script on a separate linux host using the ESXi hostname as the first and only argument and then accept the root key and provide the root password. The script will update the files, restart all the services, and then backup the changes so they are saved.
  4. Once all the hosts have been changed, run this powershell code to stop the SSH service:
    connect-viserver serverName
    get-vmhost | foreach-object { get-vmhostservice -vmhost $_ | where {$_.Key -eq 'TSM-SSH'} | stop-vmhostservice -confirm:$false }