Category Archives: General

VCAP5-DCA exam experience

I sat the VCAP5-DCA exam yesterday, also known as VDCA510. Actually taking the exam fulfills a journey I started on back in 2011 when I first registered for the vSphere 4 version of the exam. However, taking a new and busy job, plus life in general caused me to cancel and ultimately schedule the vSphere 5 version of the exam, and then reschedule it a half-dozen times.

By the time it finally rolled around, I was sick of studying and thinking about it and ready to just get it done and over with.

It was a good experience and I’m pretty sure I passed, and hopefully did pretty well. I tried the tactic of going through all the questions and writing down briefly what topic they were about, whether they were “administrative”, “configuration”, or “troubleshoot”. That was helpful to get an idea of what would be coming up as I moved through the exam, but ultimately I just started at question 1 and worked my way through the rest of them.

I was grateful to have the vSphere 5 PDFs available with Adobe Reader to search through them and am not ashamed to admit that I did refer to a few things in there, especially when it came to some PowerCLI stuff.

I believe I answered every question correctly and accurately, and only ended up skipping one due to time. I had circled it to come back and deal with later as it was not integral to future questions, but with 5 seconds remaining, I went ahead and clicked Finish, so oh well. I did managed to complete 2 that I had circled to return to, so that was satisfying.

The Pearson Vue site had nice 20-inch widescreen monitors, but unfortunately the PC or remote desktop was only configured to run in 4:3 so the resolution was something like 1280×1024 and could not take advantage of the widescreen monitor. This was annoying when I had many different windows up and was bouncing between things. My advice, minimize everything as soon as you’re done so you can easily call it back up from the rows of minimized windows at the bottom (no start bar). Much better than hunting through a bunch of open windows to find the one you need.

One other issue was that during one of the questions, I had to press a function key within a VM console, but none of the function keys seemed to work – as if Pearson or something had disabled them. Using F2 to try to rename a file in a remote desktop did not work either. I emailed the Certification team to share my experience so hopefully I will still get full credit for the question.

The resources that I relied on were:

Probably most helpful was my day to day vSphere administration that I do for various customers. However, as with any exam, there were questions on areas that I am just not too familiar with because my customers don’t use those pieces, so I did have to lab them up and play with them a bit.

What I liked about the exam was that I was free to accomplish the question in whichever manner I was most comfortable with, which was via the GUI. But some questions were specific to using the CLI, so those had to be done via that, and I was glad to have the documentation to refer to.

On to the VCAP5-DCD!
Build numbers

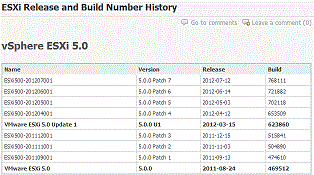
VMware titles its interm releases as “Update 1” or “Update 2”, etc. But in vSphere client, the version is displayed with a build number. And in the VMware HCL, the versions are displayed using the “Update” number.

Trying to make sense of this can be difficult, but luckily Virten.Net (@viFlorian) has an ESXi Release and Build Number History page which helps make sense of it all.

On a related note, if you need to decipher a SQL Server build number and relate it to version and service pack, check out SQLServerBuilds.

Hot-cloning a VM without vCenter

Recently had a situation arise where a stand-alone ESXi 5 host that was not managed by vCenter (it’s standalone, get it?) needed one of its VMs cloned, but the source VM was important and could not be powered off for a cold-clone to be performed.

Thanks to VMETC.COM’s Cloning a running Virtual Machine using the Service Console, (who gives credit to Eric Siebert), the process is pretty simple, and really just uses vmkfstools to make a copy of the source VM’s disk after a snapshot has been created. This frees up the source VM’s disk(s) for reading by vmkfstools to make a copy.

  1. Create a new VM with identical settings as the source VM
    1. Memory
    2. CPU
    3. Disk (SCSI controller, etc)
    4. Network
      1. Set the NIC to not connect at startup, and change the portgroup assigned to a vSwitch with no other guest VMs or physical uplinks, in order to isolate it so it does not interfere with the source VM.
  2. Using the vSphere client connected to the host, take a snapshot of the source VM – do not include guest memory. Name the snapshot whatever you’d like.
  3. Now that a snapshot has been taken, the source VM is writing to its delta disk and not its main disk (still reads from it though) so it can be cloned using the command line.
  4. SSH to the ESXi host (or get on the ESXi host console) and navigate to the new VM’s directory and delete the vmdk files: rm *.vmdk
    1. This clears the way for the disk copy to be succcessful, but keeps the disk registration in the new VM’s vmx configuration file.
  5. Navigate to the source VM directory and use vmkfstools to clone the disk: vmkfstools -i sourceVM.vmdk -d thin /vmfs/volumes/datastore01/newVM/newVM.vmdk
    1. This will create a thin-provisioned (-d thin) copy (-i) of sourceVM.vmdk from the source VM’s directory to the newVM’s directory (/vmfs/volumes/datastore01/newVM).
  6. Clone any other disks
  7. When the clone is finished, power it on (making sure it’s on an isolated portgroup with its NIC disconnected)
    1. The OS will act like it was hard-powered-off so it may do some disk checks at boot in order to mark the filesystem as clean.
  8. Open up the console of the VM and change its IP address and hostname and anything else that would conflict with the source VM.
  9. Once done, connect it back to the appropriate portgroup and you should be all set!
  10. Don’t forget to remove the snapshot on the source VM!

The process is incredibly simple and much faster than spinning up a win2k8 instance with a demo instance of vCenter, just to make a clone of a VM. It’s also easier than using VMware Converter to do a V2V conversion.

If using this method to clone a Windows guest, there may be some extra work involved (such as re-joining to the domain, etc).

Changing ESXi Syslog from verbose

We have about 55 ESXi 4.1 hosts in our environment, all configured to send their syslog data to a standalone linux (Ubuntu) blade server (HP) which also runs our Nagios server monitoring system. Since pointing all the ESXi hosts to the Nagios server for their syslog data, the server is constantly drowning under a massive amount of I/O that needs to be written to the filesystem.

Using iostat -x 1 I could see that the utilization of the disks was always around 100% and the average wait could explode up to 3000+msec which is not that great. I assumed it was syslog causing the problem but I’m not quite sure. Either way, I don’t need all the verbose data from the ESXi hosts in syslog and clogging up the I/O subsystem so here is a way to change verbose logging to something else (none, error, warning, information) (based on http://communities.vmware.com/thread/285254)

Here is what I did:

  1. Enable Remote Tech Support Mode (SSH) on all hosts seen by the vCenter server “serverName” using Powershell:
    connect-viserver serverName
    get-vmhost | foreach-object { get-vmhostservice -vmhost $_ | where {$_.Key -eq 'TSM-SSH'} | start-vmhostservice -confirm:$false }
    
  2. Create a script that SSH’s to a given server to run the commands:
    #!/bin/bash
    
    ssh -l root $1 "mv /etc/vmware/hostd/config.xml /etc/vmware/hostd/config.xml.orig && sed -e 's/<level>verbose<\/level>/<level>warning<\/level>/' /etc/vmware/hostd/config.xml.orig > /etc/vmware/hostd/config.xml && mv /etc/opt/vmware/vpxa/vpxa.cfg /etc/opt/vmware/vpxa/vpxa.cfg.orig && sed -e 's/<level>verbose<\/level>/<level>warning<\/level>/' /etc/opt/vmware/vpxa/vpxa.cfg.orig > /etc/opt/vmware/vpxa/vpxa.cfg && services.sh restart hostd && /sbin/auto-backup.sh"
    

    Using sed, it updates /etc/vmware/hostd/config.xml and /etc/opt/vmware/vpxa/vxpa.cfg to replace the default “verbose” logging levels with “warning” (which could be any of the levels mentioned earlier)

  3. Run this script on a separate linux host using the ESXi hostname as the first and only argument and then accept the root key and provide the root password. The script will update the files, restart all the services, and then backup the changes so they are saved.
  4. Once all the hosts have been changed, run this powershell code to stop the SSH service:
    connect-viserver serverName
    get-vmhost | foreach-object { get-vmhostservice -vmhost $_ | where {$_.Key -eq 'TSM-SSH'} | stop-vmhostservice -confirm:$false }
    
Virtualization stack

Welcome to VirtIRL!

Welcome to VirtIRL – Virtualization: In Real Life – a virtualization blog dedicated to the usage of different kinds of virtualization technology in real life. Not necessarily limited to server or desktop virtualization, I cover any sort of virtual topic as it comes up in my daily work life.

A lot of virtualization blogs cover the in-depth configuration of the various products that are out there, but not many are dedicated to the day to day usage of the technology and its real-life implementation.

My name is Chris and I work for a 200-bed health care provider in the West Michigan area. I’m not a virtualization guru but I plan to outline how we use virtualization to reduce our physical server count and increase the availability of our applications. My configurations may give you a good jumping off point for building your own infrastructure, or they may not make any sense at all for your organization.