Category Archives: Storage

Recreating a missing virtual machine disk (VMDK) descriptor file

For those days where you feel like pulling out your hair, VMware offers these lovely articles:

Had a VM the other day with a snapshot. Needed to make a new snapshot, but it refused. Powered off the VM to make the snapshot (failed) and then it wouldn’t power back on. Looked in its folder and found the -flat and -delta VMDKs (data intact), but no descriptor files.
Luckily the snapshot chain was not long and it was easy to recreate the descriptor files, even though vmkfstools did not like the ‘pvscsi’ controller option, so I used lsi and changed it to pvscsi it in the descriptor file.

Thin vs Thick

Imagine a vSphere 4.0 environment, running short on space with a dozen or so small datastores and most VMs using thin-provisioned disks. A decision is made to consolidate to fewer/larger datastores and convert the VMs to thick to make it easier for the distributed administration team to realize when a datastore was low on space and not consider it for new VMs, and to also prevent any catastrophes from over-subscribing a datastore with thin-provisioned VMs that eventually fill up and overflow the datastore.

Before doing this, we need an understanding of the different vmdk storage formats. Luckily, EMC guru Chad Sakac outlines these disk types in his article Thin on Thin? Where should you do Thin Provisioning – vSphere 4.0 or Array-Level?.

  • Thin: A VM’s thin-provisioned vmdk only consumes as much space on the datastore as the guest OS has written to its volumes inside the VM (the hypervisor quickly zeroes out the next available block and then commits the VM’s write IO). This format allows provisioning ahead of time an amount of storage the VM is expected to need over its lifetime and without the need to expand it in the future (though it can be expanded, if necessary). This also allows for over-subscribing a datastore by creating multiple VMs where the total sum of their thin-provisioned disks is larger than the datastore is actually capable of holding. This is OK while there is a lot of free space, but when free space is low and used space starts creeping up close to the total size of the datastore, extra caution must be taken to prevent the datastore from filling up entirely, causing a major headache. Simple things can easily push it over the edge such as VM swap files, snapshots, or other normal usages.
  • ZeroedThick: A VM’s zeroedthick-provisioned vmdk appears to the datastore filesystem to be as large as the original provisioned size and actively using all that space. However, from the perspective of the storage array hosting the datastore LUN, only the amount of data written by the Guest OS to its volumes is actually written to the vmdk on the datastore. The array sees this small usage and not the larger usage of the entire vmdk that the datastore reports for the vmdk. This is important when using array-based thin-provisioning. LUNs with zeroedthick-provisioned VMs do not consume any more space than thin-provisioned VMs, so thin-provisioning on the array is still useful. When a VM needs to write a new block, no zeroing is required since the vmdk already lays claim to blocks on the filesystem that it needs, and space isn’t wasted on the array, and a datastore cannot overflow or be over-provisioned.
  • EagerZeroedThick: A VM’s eagerzeroedthick-provisioned vmdk actually does consume the entire amount of provisioned space both on the datastore and on the underlying LUN. Any space remaining in the vmdk after the Guest OS has written what it needs is filled up by blocks of zeros. Consequently, these types of vmdks take awhile to create because the hypervisor inflates the vmdk with these blocks of zeros which must all be written to the storage array which also has to commit space. Not only Guest OS data but also zeroed blocks that the hypervisor has written out at disk creation that haven’t been overwritten by guest data. However, if the array supports a feature such as ‘zero-based page reclaim’ in a thin-provisioned pool, it can scan for these zeroed blocks and reclaim them as free space since it recognizes that no data is actually stored there. Note that the VMware feature Fault Tolerance (FT) requires eagerzeroedthick-provisioned disks, as does VMs participating in Microsoft Clustering (MSCS). This requirement ensures the space is there to support the critical availability requirement inherent in FT and MSCS VMs.

The concern is that by converting from thin-provisioned to thick-provisioned VMs during storage vMotion to new/larger datastores, lots of additional space would be used on the datastores and disk array. The important part to know is that while the datastore appears to be using more space with all VMs being thick-provisioned, it actually isn’t using all that space on the disk array because the VM disks are converted to zeroedthick-provisioned during storage vMotion. Not eagerzereodthick.

Determining linked-clone space usage

I wanted to understand how VMware View linked-clone virtual machines consume space. Thankfully, Andre Leibovici has a great article “How to read Linked Clone Storage Provisioning metrics in vCenter“, describing these three storage metrics that are visible from a VM’s Summary tab in vSphere. (Need a review of how linked-clones work? Check out Andre’s “VMware View 4.5 Linked Cloning explained“)

These three storage metrics for every VM are described as follows:

  • Provisioned Storage: amount of total storage provisioned to a VM, since thin-provisioning is in use. This only includes files in the VM directory and is the sum of the “Provisioned size” column in the VM’s folder on the datastore. These files include the main VM disk which actually points to the replica, and then also the snapshot/delta disk. So easily, a linked clone has a provisioned size that is double that of the master VM (and therefore the replica). But it’s slightly misleading because the replica will not grow, only the VM’s snapshot/delta file will grow as the VM is used, until the next recompose.
  • Not-shared Storage: the total storage actually in use by the linked-clone, which only includes files in the VM directory. This would be the sum of the “Size” column in the VM’s folder on the datastore, and is data that the linked-clone has written after recompose or refresh: changes recorded in the delta (snapshot) disk.
  • Used Storage: the sum of storage used to support the existence of the virtual machine – includes the replica disk as well as changes that the VM has written since recompose or refresh.

With these key pieces of information, we can see that the most important metric is “Not-shared Storage”. However, “Used Storage” is useful to compare space savings. If the linked-clone VM was a full-blown normal VM, it would consume the amount indicated in “Used Storage”. But since it is using linked-clone technology, it only actually uses the amount indicated in “Not-shared Storage”, because the main bulk of the VM’s data (operating system, applications baked in to the image) is actually stored in the replica disk which is also used by all the other linked-clones.

If you want to compare across the entire environment and generate a space savings calculation, a bit of powershell can accomplish this:

Function GetUsage {
	Param($datastore)
	$VMs = get-datastore $datastore | get-vm | get-view
	$VMs | foreach-object {
		$VMName = $_ | select -expandproperty name
		$VMUnshared = $_ | select -expandproperty storage | select -expandproperty perdatastoreusage | select -expandproperty Unshared
		$VMUnsharedMB = [math]::round($VMUnshared/1MB,2)
		$VMUsed = $_ | select -expandproperty storage | select -expandproperty perdatastoreusage | select -expandproperty Committed
		$VMUsedMB = [math]::round($VMUsed/1MB,2)
		$UsageObj = New-Object System.Object
		$UsageObj | add-member -type noteproperty -name Name -value $VMName
		$UsageObj | add-member -type noteproperty -name UsageMB -value $VMUnsharedMB
		$UsageObj | add-member -type noteproperty -name FullUsageMB -value $VMUsedMB
		$UsageObj
	} | sort -property Name | export-csv c:\temp\usage-$datastore.csv -notype
}

GetUsage "Linked_Clones_01"
GetUsage "Linked_Clones_02"

To run, save it to a file and change the datastores on the “GetUsage” lines (add or remove datastores as needed) and change the CSV path as necessary (default: c:\temp). Connect to a vCenter server (connect-viserver) and run the script. The resulting CSV file will have three columns: Name of the VM, UsageMB (“Not-shared storage”) and FullUsageMB (“Used Storage”).

By adding up the UsageMB column and comparing it to the sum of the FullUsageMB column, one can easily see the difference in space usage by using linked-clone technology versus full-blown virtual machines. To calculate the space savings percentage, use the formula (1-(Usage/Full)).

A customer with over 3,000 linked-clone desktops (using a master VM image of 30GB) is only using 6.55 TB on disk. If these were full-blown virtual machines, the customer would consume over 91TB. By using linked-clones, the customer is realizing a space savings of 93%. Pretty cool stuff.
Datastore usage via powershell

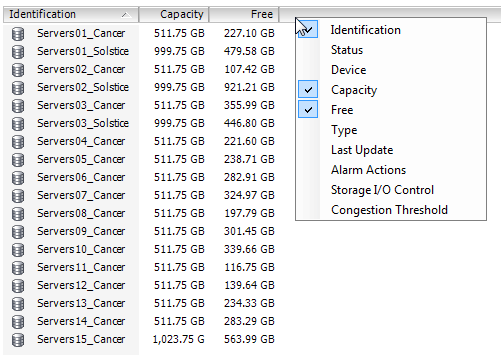
In the vSphere Client, Datastore inventory view (Ctrl+Shift+D), VMware kindly gives us datastore Capacity and Free space values, but there is no column for Provisioned.

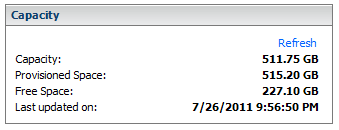
If you open a datastore, the Provisioned amount is displayed:

In my (humble) opinion, besides knowing how much Free space is left on the volume, Provisioned is important too so you know just how far in the hole you’re digging yourself by over-provisioning datastores, and it would be nice to see this in the list view of all Datastores as a way of comparison.

Since we don’t have that column available to us (VMware, pretty please?), a bit of Powershell can give us what we need.

connect-viserver your_vcenter_server
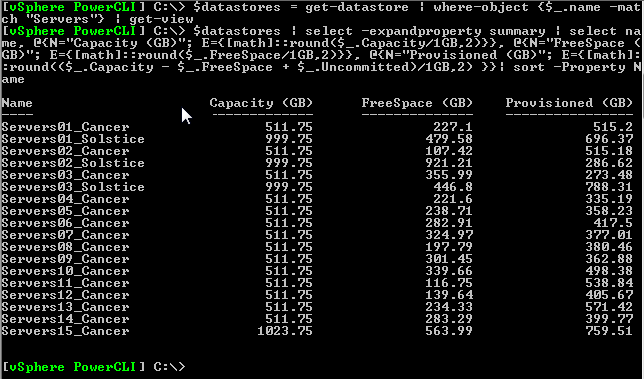
$datastores = get-datastore | where-object {$_.name -match "Servers"} | get-view
$datastores | select -expandproperty summary | select name, @{N="Capacity (GB)"; E={[math]::round($_.Capacity/1GB,2)}}, @{N="FreeSpace (GB)"; E={[math]::round($_.FreeSpace/1GB,2)}}, @{N="Provisioned (GB)"; E={[math]::round(($_.Capacity - $_.FreeSpace + $_.Uncommitted)/1GB,2) }}| sort -Property Name

In my example above, I am using where-object to filter only for datastores that have “Servers” in the name. Remove it or customize it as needed. The snippet above produces the following output:

.. you could even append “Export-CSV c:\path\to\output.csv -NoTypeInformation” to the end to write it to a CSV file, useful for Excel or other things.

Based on the following pages: