Category Archives: VUM

esxupdate error code 15 – copying payloads to altbootbank

Recently had a Cisco UCS blade running vSphere 5.0 Update 2 fail to install a patch via Update Manager. The other hosts in the cluster installed the patch fine and rebooted safely, but this one did not.

Upon review of the host’s /var/log/esxupdate.log, we find errors during the patch installation:

2013-07-16T13:14:36Z esxupdate: BootBankInstaller.pyc: INFO: Copying /bootbank/scsi-qla.v00 to /altbootbank/scsi-qla.v00
2013-07-16T13:14:36Z esxupdate: esxupdate: ERROR: An esxupdate error exception was caught:
2013-07-16T13:14:36Z esxupdate: esxupdate: ERROR: Traceback (most recent call last):
2013-07-16T13:14:36Z esxupdate: esxupdate: ERROR:   File "/usr/sbin/esxupdate", line 216, in main
2013-07-16T13:14:36Z esxupdate: esxupdate: ERROR:     cmd.Run()
...
2013-07-16T13:14:36Z esxupdate: esxupdate: ERROR: InstallationError: ("set(['VMware_bootbank_net-nx-nic_4.0.557-3vmw.500.1.11.623860', 'VMware_bootbank_scsi-rste_2.0.2.0088-1vmw.500.1.11.623860', 'VMware_bootbank_scsi-megaraid-mbox_2.20.5.1-6vmw.500.1.11.623860', 'VMware_bootbank_scsi-mptsas_4.23.01.00-5vmw.500.1.18.768111', 'VMware_bootbank_block-cciss_3.6.14-10vmw.500.1.11.623860', 'VMware_bootbank_ipmi-ipmi-si-drv_39.1-4vmw.500.2.26.914586', 'VMware_bootbank_ata-pata-amd_0.3.10-3vmw.500.1.11.623860', 'Broadcom_bootbank_misc-cnic-register_1.72.1.v50.1-1OEM.500.0.0.472560', 'VMware_bootbank_ipmi-ipmi-msghandler_39.1-4vmw.500.1.11.623860', 'VMware_bootbank_esx-tboot_5.0.0-2.26.914586', 'VMware_bootbank_scsi-mpt2sas_06.00.00.00-6vmw.500.1.11.623860', 'VMware_bootbank_uhci-usb-uhci_1.0-3vmw.500.1.11.623860', 'VMware_bootbank_scsi-mptspi_4.23.01.00-5vmw.500.1.11.623860', 'VMware_bootbank_net-r8168_8.013.00-3vmw.500.1.11.623860', 'VMware_bootbank_ohci-usb-ohci_1.0-3vmw.500.1.11.623860', 'VMware_bootbank_ima-qla4xxx_2.01.07-1vmw.5
...
2013-07-16T13:14:41Z esxupdate: HostImage: DEBUG: Live image has been updated but /altbootbank image has not.  This means a reboot is not safe.

Ignoring the “a reboot is not safe” message, I bounced the host hoping that a reboot would clear up whatever problem existed and the patch would then install successfully. Nope!

boot fail after update

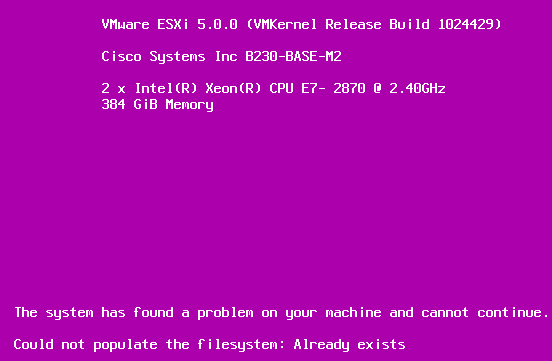
This lovely purple boot error screen was displayed right after “VMkernel started successfully.” No amount of ALT+F12 etc would work. Ultimately I opened a case with VMware and per an internal KB article, this can occur with Cisco UCS systems booting from FC SAN, as was happening in this case:

Symptoms
A freshly installed ESXi 5.0 host does not load after a reboot.
If you are booting from FC SAN and having hardware issue the ESXi 5 host can purple screen after the reboot.

Note: This issue is seen to occur during the Cisco UCS system boot from FC SAN scenario and the system file gets corrupted.

The ESXi console shows a purple screen that says:

The system has found a problem on your machine and cannot continue. Could not populate the filesystem: Already exists

Cause
This issue may be caused by a BIOS remap or a glitch of the Raid Array BIOS.

Resolution
To resolve this issue, perform an upgrade install on the ESXi host:

Boot on ESXi 5 install media.
Choose upgrade ESXi and preserve the vmfs datastore.

The host is rebuilt according to the new hardware/BIOS layout.

Additional Information
If the host fails with a purple screen when booting from FC SAN, you may have to perform an upgrade install to repair the installation.

I rebooted the blade and booted off the Cisco custom ESXi installer media, even though the build was quite old. I performed an Upgrade on the existing ESXi install on its boot LUN and after it was done, the blade booted successfully. Its configuration was intact and its build number was current.

I tried installing the patch again but it also failed, but at least with a different error message:

esxupdate: esxupdate: ERROR: InstallationError: ('', 'There was an error checking file system on altbootbank, please see log for detail.')

According to VMware KB 2033564, running dosfsck -a -w against the altbootbank partition will fix any errors and then the update can be attempted again.

To find the altbootbank disk, follow the instructions in the KB article or look in the esxupdate.log:

2013-07-16T13:11:12Z esxupdate: vmware.runcommand: INFO: runcommand called with: args = '['/sbin/dosfsck', '-a', '-v', '/dev/disks/naa.60060e8006d022000000d0220000110c:6']', outfile = 'None', returnoutput = 'True', timeout = '0.0'.

The “naa.600…” is the altbootbank – don’t forget the :6 (partition number) at the end!

Once dosfsck comes back clean, attempt the update install again and it should now be successful, including a successful reboot.

vCenter

Upgrading to vCenter 4.1

Like a lot of folks, I was excited with the release of vCenter 4.1 and ESX(i) 4.1. Lots of great new features, some bugfixes, and the overall feeling of “ooh, new shiny things to play with!”

Every new release of vCenter/ESX is like Christmas morning as there are plenty of new features to be discovered and bugs fixed that streamline previous operations.

I was dismayed at first to read that vCenter required a 64-bit OS as not too long ago I had built up a nice pair of vCenter 4.0 servers on Windows Server 2003 Standard (32-bit) and liked the way they were working. I was running SRM 4.0 along with Update Manager and everything was working great.

I knew that with the 64-bit requirement, I might as well go to Windows Server 2008 R2 64-bit for my two vCenter servers, but I had some hurdles to jump over. Specifically, we aren’t really running any Server 2008 machines in-house, save for those that we have to experiment and kick the tires with. So I decided to build a Server 2008 template and then deploy a pair of new vCenter servers from that.

The process of building a new template VM has been documented widely across the virtualization blogosphere, but I shall throw my two cents in the ring with a post describing my own win2k8 template. But as usual, that is for a later time.

The other hurdle to leap over, in addition to getting Server 2008 set up for production use, was the fact that I was going to have to relocate my vCenter servers to brand new machines. I tried this once awhile ago with VirtualCenter 2.5 and the results were diastrous. So I was not encouraged with the fact that I was going to have to try to move again.

Luckily, the VMware team understood that a lot of people would be in the same boat due to their 64-bit-only requirement so they put together a set of python scripts to aid in the moving of vCenter to a new host.

The guides that I referred to during this upgrade are:

I started out by stopping my vCenter services, backing up the Microsoft SQL 2008 Standard databases for VC and SRM, and then detaching and copying them to the new vCenter servers where I already had Microsoft SQL 2008 Standard  64-bit installed. I attached the DBs and made sure my SQL “vpxuser” account was set to owner.

Then I created a 64-bit System DSN for the vCenter database by running “odbcad32” at the Run command. I also created a 32-bit System DSN for SRM by running c:\windows\sysWOW64\odbcad32 at the Run command (thanks to boche.net for that tip)

A side note: my VUM database is part of my vCenter database, so I didn’t have to create a DSN for that – it will just piggyback on top of the vCenter DSN as it did on my Server 2003 vCenter servers.

After my DSNs were created, I followed the instructions in the Upgrade Guide to copy the datamigration folder off the vCenter 4.1 ISO on to my 32-bit server and ran the “backup.bat” to backup my vCenter certificates and other configuration that lives outside the database. It also backed up my VUM and Orchestrator configuration (even though I don’t use Orchestrator).

I copied the resulting datamigration folder to the new host. It now has “data” and “log” folders that hold the backed up configuration. I ran “install.bat” on the new host and pointed it to my vCenter 4.1 media. One thing that got me at first was it prompted for the Update Manager media path and I gave it what I thought was the path – the Update Manager folder inside the vCenter installer, but that was incorrect and I had to end up giving it the same path that I gave for vCenter. It would be nice if it would just check there first for the Update Manager installer files and then only prompt if it can’t find them.

Then the datamigration install.bat file launched the vCenter installer and I stepped through that, changing the install path to the E:\ drive that I had set up for it and pointing it to the DSN that I had configured. I also allowed it to automatically update the ESXi/vCenter host agents. Soon the installer finished and then also launched the VUM one. I stepped through that as well, again changing the path to E: and pointing it to the DSN that it needed.

The VUM install was also successful and then datamigration install.bat utility ended. I didn’t even get to see any of the host agents being updated because when I got the client installed and logged in, everything looked great. I had a few servers that needed to be reconfigured for HA but other than that, the install went great.

I repeated this process on my 2nd vCenter host and it went well too.

I did have to break up my linked-mode config as it sort of stopped working – I could log in to one server and see both, but if I logged in to the other one, it would only show that one and an authentication failed message for the other one. I had to “force” it to isolate itself from linked-mode, but I think that was because the vCenter service hadn’t stopped in time. But 2nd time was a charm and after joining them back together, all was well.

I then installed SRM 4.1, paying careful attention to the release notes (linked earlier) describing how to relocate SRM to a new server with a new name. I installed the HP EVA Storage adapter and visited my SRM config to make sure it was OK. It was but I did have to reconfigure the EVA credentials. I don’t know if they were lost or what but it was no big deal. I ran a test recovery plan and that worked perfectly.

I then reconfigured VUM to not download VM patches for Windows or Linux and none for ESX3. I also added the ESX4.0 to 4.1 upgrade zip and created a baseline for upgrading all my ESXi 4.0 hosts to 4.1.

Finally I remembered to copy the sysprep files off my 2k3 vcenter servers so that we can continue deploying/customizing 2k3 and XP server VMs.

At this point, everything looks great and I’m heading home. ESXi upgrade next week!

Disable cluster HA before VUM remediation of hosts

I have discovered that during the intense process of host remediation using VMware Update Manager, VMware HA on a cluster may become misconfigured and no longer function correctly. This can cause issues when VUM commands a host to enter Maintenance Mode and all the VMs need to VMotion away, but all eligible hosts are reporting errors with their HA configuration (usually because all the primary HA agents are no longer responding and hosts can’t reconfigure themselves after exiting maintenance mode).

Without eligible hosts to VMotion VMs to, the enter-maintenance-mode task will fail. VUM handles this failure depending on how it is configured when the update task was created. I usually set it to Retry with 1 minute delay, a maximum of 5 times. This allows me to notice the failure if I happen to glance at the client and figure out what to do to help it along. VUM could also Fail the update task but this is annoying if the task hasn’t gotten very far with other hosts in the cluster. It would be nice if the host could be skipped after it couldn’t enter maintenance mode and VUM could focus on the rest of the hosts.

It seems the best thing to do is to just disable HA on the cluster before starting VUM remediation. Instead of HA being disabled/enabled for each host during the process, they are all disabled. This saves time on the overall process and now VUM will not fail the entire task.

With that being said, in addition to VUM skipping hosts that can’t enter maintenance mode, it would also bee nice if the cluster itself could recognize the total HA misconfiguration and globally disable/enable it accordingly. That’s what the Administrator would have to do anyway so automating this would be nice.

Reinstalling Update Manager

One of my monthly health checks for our vSphere environment (which I’ll detail later) is to run a VUM (VMware Update Manager) scan of our ESXi hosts to see if they’re missing any patches. One of the things I love about ESXi is the fact that it does not have a full-blown Service Console like the “full” or “classic” ESX. This service console is based on redhat so any RedHat patches that are released by them are also needed on the ESX service console. But ESXi’s minimal service console isn’t based on RedHat and therefore doesn’t have all those extra pieces of software that need to be patched.

So ESXi patches don’t come out very often but I do make it a point to scan my hosts monthly and apply any updates that have come out. Usually these updates consist of updates to VMware Tools and then a new firmware image for ESXi.

This is the first month that I’ve implemented these monthly health checks and I’ll start by running that VUM scan.

We have two vCenter servers (which I’ll detail later) and they both have their own installation of VUM and their own patch repository. I do want to get to having a combined repository to save space, but they’re not very big so it’s not a big priority at the moment. The first vCenter server, Aero, which manages the ESXi hosts/clusters in our primary datacenter showed the “Update Manager” tab as expected when I clicked on the top-level vCenter server object in vCenter client, but when I went to check on Extra, our other vCenter server which manages the ESXi hosts/clusters in our secondary datacenter, the Update Manager tab was not present! It wasn’t there on any of the expected levels – vCenter server, Datacenter, Cluster, or Host.

I checked that the VUM plugin was installed and enabled on both my PC where I have the vSphere Client installed, and I also checked that it was installed and enabled on the vSphere Client which I’ve installed on the vCenter server Extra. It looked good but just to be safe, I disabled it and relaunched the client. No change. Then I uninstalled it from Add/Remove programs and installed it again via the client. No change. At this point, since I was seeing the behavior on both my PC and the vCenter server itself, I decided the problem must be with the VUM service itself. I restarted the VUM service on the vCenter server but that did not make any difference either.

I did a quick google search [missing “update manager” tab] and ended up at this post on the VMware Communities forum for vCenter Server: missing update manager tab where others had experienced the same problem. I knew that my issue was not that I hadn’t scrolled the tabs over far enough, and I didn’t understand the PATH issue that others had mentioned. I did check my PATH variable but it looked OK and we don’t use Norton products. We are running a 32-bit OS though, but we aren’t getting any messages about a lack of drive space. Either way, I decided to reinstall the VUM service. I visited the vSphere download page to see if there was a newer release than what I had previous downloaded, but there wasn’t.

I extracted the zip file for the VUM service which I had downloaded a few months ago when this latest release came out and copied the files up to my vCenter server. The structure inside the zip file containing the VUM install files is always a bit of a mystery. I navigated to the “bin” folder and found the VMware vCenter Update Manager.msi file which I right-clicked on and chose “Repair” just for fun. This failed saying it couldn’t register with the vCenter server or something, so then I right-clicked again and chose “Uninstall”. After verifying the service was no longer listed in Services, I doubleclicked on the VMware-UpdateManager.exe file to launch the installer.

I gave it credentials to connect to the vCenter server and reused the existing VUM tables inside my vCenter database. After the service was up and running, I launched vSphere Client and found that the Update Manager tab was back! I doublechecked the settings in “Admin View” and found that the Patch download schedule wasn’t really configured correctly. I set it to run every day and email me when new patches are found. I also made sure to set the time to be within a few minutes. Soon the task started and apparently didn’t have to download much because it ended pretty quickly.

I was then able to rescan the datacenter and find that my ESXi hosts are missing 1-2 patches.

I will write about how we use Update Manager at a later point but just wanted to point out that sometimes it just comes down to reinstalling a product to get it to work correctly. Luckily the configuration is stored in a database and that was able to be reused so reinstalling it wasn’t any big deal. There’s not much to configure anyway with VUM but it’s nice to be able to reuse the database.